Fluency Station in a Special Education Classroom: Setting it all up!
Sharing is caring!
I was in a place in my teaching career where I had stepped into a new realm. I had never taught special education before and I was looking for ways to teach the wonderful students I was about to meet. This all happened about two weeks before school started. I was going from teaching in a alternative education placement with sixth through twelfth graders to teaching middle school students with severe cognitive disabilities. I was nervous, excited, and scared all at the same time.
If you know anything about my previous teaching you would know I have taught first grade and Pre-K in regular education settings prior to that but, in so many ways I felt like a brand new teacher in a special education self contained classroom. I did what most teachers would do when I found out I got the job, I researched! I read blogs and signed up for emails and I stumbled across some amazing teachers and blogs that ultimately got me where I am today.
This post is going to be talking about one area of my classroom that was truly inspired by one of those teachers and blogs, this area of my classroom has barely changed at all in the five years that I have taught in self contained special education because it has worked THAT well. So, let’s dive into what a fluency station looks like in my classroom.
First, let’s discuss what fluency is for anyone that might not know. Fluency is defined as the ability to conduct a skill with speed and accuracy. As you will find in this blog it does not just mean to read. We often hear about reading fluency but, there is so much more to it then that. Students have skills that they need to be able to do in a quick and fluent fashion. Things that most of us would take for granted and then also some academic skills. This is when I read and researched about creating a Fluency Station in my classroom. Here are some blogs that helped!
TEACHER TRUTH: This is a station that I have had a paraprofessional run for every single year, and I’ve even had different ones that were brand new to my classroom do it and it has worked well every year!
**If you want a great set of videos talking about my fluency station you can find them on my Instagram Highlights here…
CREATING THE STATION & PRE-ASSESSMENT:
The first thing is to look through and determine the skills that your students need to gain fluency in. This can be challenging if you don’t know the students, but looking at their IEP can help. If you don’t know the skills through the IEP you can do any type of basic skills assessment depending on the age of your students. Some starting ideas are:
-Letters
-Colors
-Numbers
-Shapes
-Addition Facts
-Subtraction Facts
-Sign Language
-Imitation of Body Movements (clapping, touch nose, etc.)
-Life Skills (buttoning shirts, opening/closing containers, putting a straw in a cup, etc.)
-Expressive Personal Information (can you tell me your address?)
-Receptive Language (you tell the student to touch their head and they do it)
Here are some pictures of the bins with cards inside:
 |
| Pictured are: States, More, Why Questions, Dolch Sight Words, Time |
 |
| Pictured are: Function of Items |
Here are some TPT Stores where I’ve found materials to use:
Here is the cabinet and bins that I use to keep the others stored (labels on these are my goal this summer)
The other thing you can do is if your district has assessments available to you such as the VB MAPP or ABLLS these can provide you with a myriad of skills and show you what the students need to work on. These assessment can be time consuming but, if you don’t know where to start they can certainly help with that.
The key to this type of station is you want it to be a skill that in your data the student has mastered at least to 80%. So, for example if you are doing math facts and you had 20 cards in the set you would want 16 of those cards ones that your student knows and 4 that are “unknowns”. This is helpful to the student in that they won’t get frustrated to easily because most of the skills they know how to do already. I do not run these are instructional sessions with completely new content, but if you’d like to you sure can.
TEACHER TRUTH: You potentially aren’t going to know how to find that 80%/20% balance until you trial it with your student, and it’s not something that I obsess about keeping perfect ALL the time. We just try to do this as much as possible.
WHAT MATERIALS DO YOU NEED?:
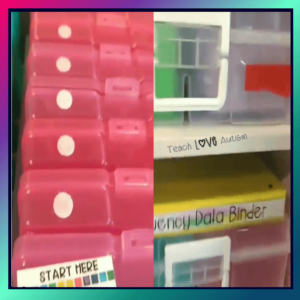
You can’t really know what materials you need until you know the skills you are working on. If you decide to do mostly flashcards then you want a way to store them. I use the Iris Photo Containers and actually color code them like this:
I also had a student working on buttoning pants so we had cut out the bands to pants from our school’s lost and found and kept those in a bin on the shelf and we would time him on how quickly he could button a bunch of pants. So, you can be creative with how you store everything.
TEACHER TRUTH: Please know that you can work on any skill you want! I like to work on more academic based skills with my higher students and then more life skills or transition skills with my lower students. I’ve also done communication skills with devices!
Here is a quick list:
Card Storage (bins, Iris boxes, tubs)
Bins for other materials (aka cards not in use)
Binder for Data
Pens or Pencils
Timer or Clicker
You can look at my Amazon store to get almost all of these materials. I do make a small commission for these items if you’d purchase through my store. Teach Love Autism Amazon Store
TAKING DATA:
The whole station would not be purposeful if you were not taking data. You need to know what the scores are for the students what date they start and their score, their progress as they work on mastery, and their date of completion mastery and score. Otherwise, you are doing what I call “busy work” and honestly, both your students and your staff will figure this out and take all the importance of the station away. If you knew no one was keeping track of what days you worked would you come everyday? Probably not.
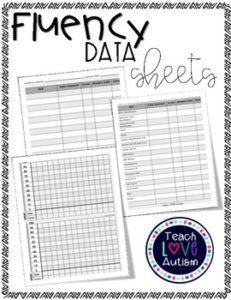
Here is an example of the data sheet that I have my paraprofessionals use. I have one binder with divider tabs in each that is one for each student. Within that I have a page that looks like this for each skill or Iris box set of cards that the student works on. This helps to see the growth on just that one skill in a quick snapshot.
Yes, I have them time the students, although you do what is best for your students. I have had some that this causes tons of anxiety and we just finish the pile and take the score of correct out of the total. This works just as well. I have other students that love the challenge of trying to beat the time. If we are being honest, you should time because fluency is about speed and accuracy but YOU DO YOU!
TEACHER TRUTH: Sometimes my para forgets to take the data. That’s OKAY. I just check in about once a week to make sure she is doing it and to look for trends. It is still our job as educators to check in on our student’s progress.
Just so you know, I plan to do a Part 2 very soon all about the actual way that I run a fluency station, how to correct when a student makes a mistake, how I train the para, and how to know when you have a student that has completely mastered the skill and you are ready to move on. So, stay tuned, get those stations set up and your materials ready and I’ll be back with more in my next post!
Until Then!!
HERE IS A FACEBOOK LIVE I DID ON SETTING IT UP!
HERE IS A FACEBOOK LIVE I DID ON SETTING IT UP!
HERE IS THE FREEBIE DATA SHEETS IN MY STORE!!


